With award show season in full swing and Fashion Week around the corner, there’s no shortage of “hair-spiration” out there. One of the reoccurring looks that every supermodel and celebrity is rocking this season? Braids! The “oldie-but-goodie” style is forever being reimagined on the red carpet and the runways, providing stylists and braiding “pros” with plenty of looks to try out. But what about the non-expert braiders? You know, the women who have enough trouble trying to pull together a traditional three-strand braid to bother with any other woven style. Guess what? You’re in luck! This year, we’ve spotted an array of easy-to-execute plaits on celebs and models alike. Check out the top tips for beginning your braid and the trendiest braided looks we’re loving at the moment.
Ever wonder how some girls can create a perfect fishtail braid in five minutes flat? Practice, practice, practice! For some women, a simple three-strand braid can feel like a nearly impossible task. Luckily, learning how to braid is actually easier than you think. Read on to find out how to become a braiding master.
When you see braids walking down the street, it's easy to watch them and wonder how you can get your skills to that level. I mean, I’ve literally watched a girl complete a perfect fishtail braid in traffic – no mirror necessary. For some women, even a simple three-strand braid can be a challenge. Whether you lacked help growing up or have been putting off the task since adulthood, braiding can actually be a lot easier than it looks. First, start by stocking up on a few key items, prepping your hair and then just trying things out. Start with these steps and then keep reading to see our top braids!
Step 1: Stock up
Braids do better when hair has something to hold on to. Depending on hair type, fine and straight hair generally need a little more support. Stock your cabinets full of products that can be used to get you the braids you desire. A great styling gel or cream will minimize slip and better hold your style. Our favorite braid product? Redken Braid Aid 03. Another essential? Shine spray. Add Redken Outshine 01 to your mid-lengths and ends before braiding to restore moisture and add softness.
Step 2: Grab the right brush
Before attempting any braided style, make sure to keep a few brushes on hand to rid hair of knots and tangles. A boar-bristle brush is a great way to gently smooth through strands while adding shine and luster from natural oils. A detangling paddle brush is another key tool to keep on hand.
Step 3: Prep your hair
Before you get down to braiding, consider prepping your hair for the task at hand. Once you’ve got the proper tools and products, start the prep work! Starting in the shower, opt for a hydrating shampoo and conditioner to add moisture, then apply a nourishing leave-in treatment to protect hair from breakage. Dry hair as desired, then gently brush through hair to get rid of any tangles prior to beginning your braid.
Step 4: Begin braiding!
If you’re just starting out, aim to master a single three-strand braid before moving on to more complicated styles. Start out by combing your hair into a low ponytail, then divide hair into three sections and begin crossing the sections over one another (left over middle, middle over right and so on) until you’ve braided the entire ponytail. If you’re having trouble, ask a friend to demonstrate on her own hair and try mirroring her techniques. Once you’ve mastered the three-strand braid, try your hand at other more complex braided styles. Need some #braidinspo? Keep scrolling, we’ve got you covered!
Look #1: Braided Low Pony

Image: Allure
Never one to shy away from high fashion looks on the red carpet, singer/actress Janelle Monae served killer looks at the 2019 Grammys with an edgy hat and a braided horsetail pony. The best part? The flowing ponytail is insanely easy to recreate!
- Work a volumizing mousse and/or thickening spray into the mid-lengths and ends.
- Pull the hair into a low ponytail at the nape of your neck, then divide the ponytail into three sections.
- Create a three-strand braid, then secure the hair with a clear elastic.
- Starting from the base, gently pull apart the braid to create fullness. Finish off the look with hairspray to keep flyaways in place.
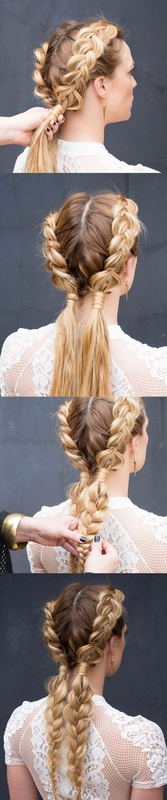
Look #2: Cool Cornrows
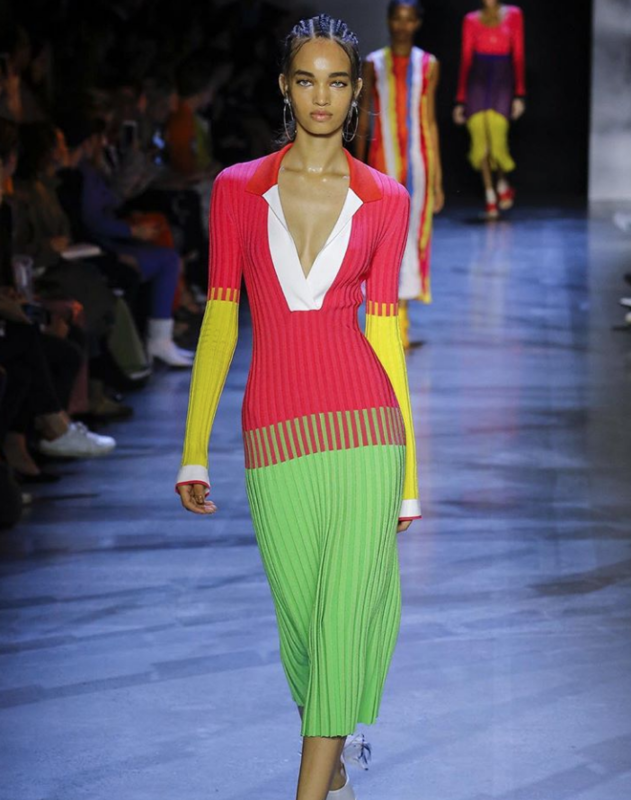
Instagram//@ellenghr_//@prabalgurung//@alexwhiteedits
Edgy plaits reigned supreme on the Prabal Gurung SS19 runways. The key to the sleek, vacation-ready look? Mastering the row braid. Similarly to a French braid, a row braid involves gradually adding in strands of hair. The only difference? Smaller sections, and you must pull the strands under one another, rather than cross them over and keep them as close as possible to the scalp.
- Start with a center section part from the hairline to the nape of the neck.
- Create two more parts along each side of the head, and then split those in half again resulting in at least 5 sections.
- Apply styling wax to each section. Then, apply a small amount of styling wax to your fingers and weave each section into a small row braid. Secure each braid with a small hair elastic.
- Apply hairspray to smooth any flyways and finish off the look.
Look #3: Double Crown Braids
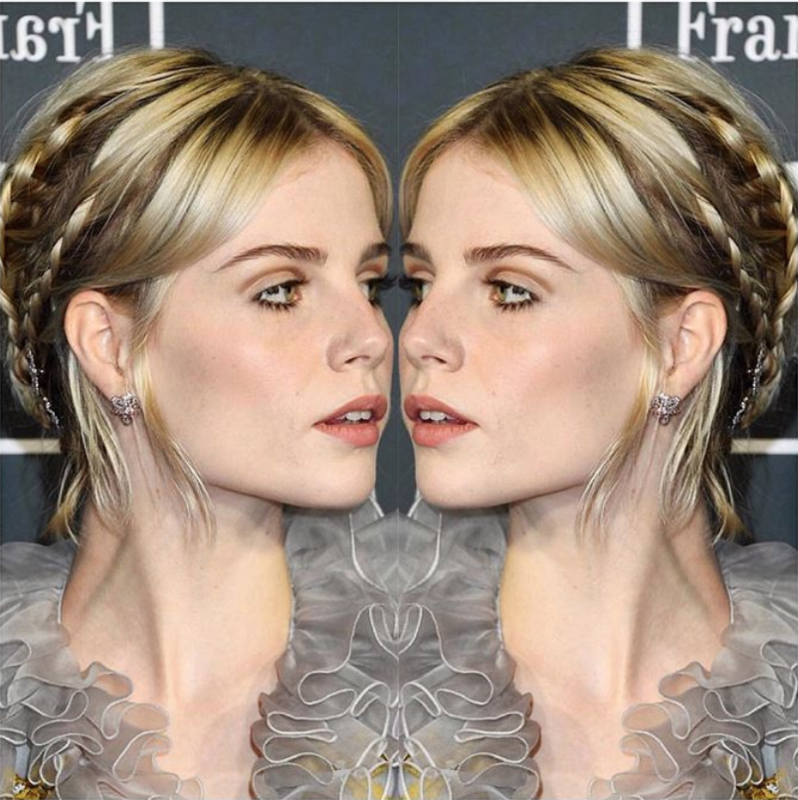
Instagram//@jennychohair
The “Bohemian Rhapsody” actress’s double plaits looked equal parts royal and rock n’ roll on the red carpet at the 2019 Critics’ Choice Awards. The winning touch? Celebrity stylist Jenny Cho secured sparkling star pins along the nape of the neck for a whimsical touch. The result? A playful, effortless updo ideal for any special occasion.
- Place a clear elastic headband over the head. Use the tail end of a comb to pull out the hair at the crown to cover the headband.
- Create two tiny braids along both sides of the head, weaving them around the headband. Secure the braids with clear hair elastics. Repeat on the other side.
- Tuck the ends of the hair into the headband and pin any flyaways.
- Apply decorative pins along the nape of the neck. Finish with hairspray.
Look #4: Braided Ballerina Bun
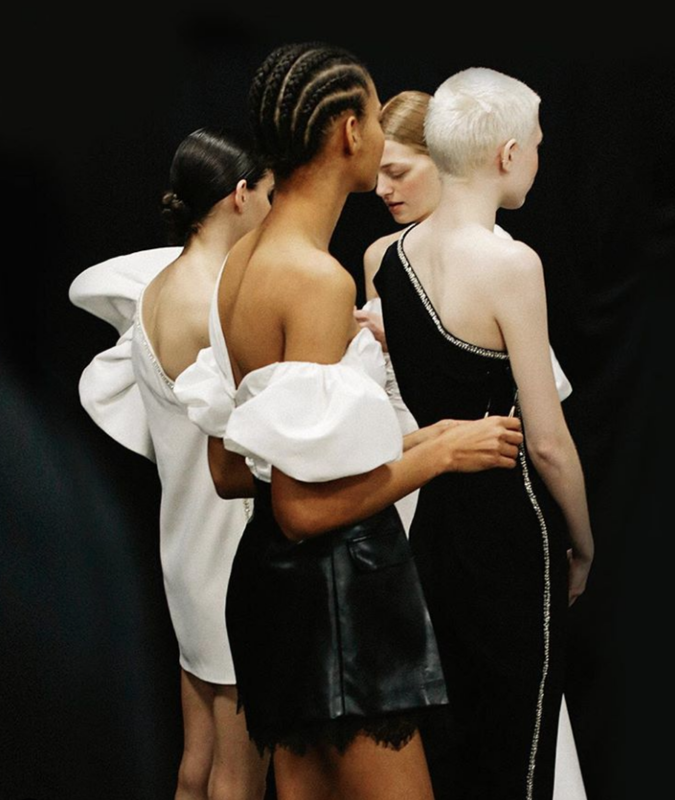
Instagram//@selfportrait
In the sea of low buns on the SS19 runways, the braided styles at the Self Portrait show stood out above the rest. A simple, sleek center part from the front and an embellished treat in the back!
- Using a boar bristle brush, pull the hair into a low ponytail and secure it with a hair elastic.
- Create a three-strand braid and secure it with a hair elastic.
- Wrap the braid into a tight chignon, leaving the ends out, and pin it in place.
- Apply a small amount of wax to your fingertips, then smooth down any flyaways and finish the look with hairspray.
Look #5: Milkmaid Braids
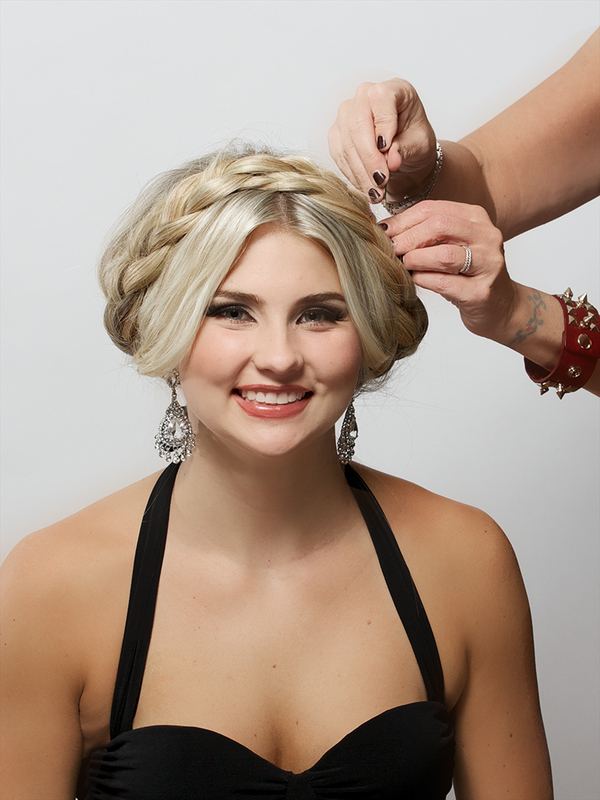
Image: Sherri Jessee
Looking to get your hair off your neck without resorting to a messy bun or ponytail? Milkmaid braids are flirty and feminine. Plus, they can be worn day or night.
- Divide the hair down the center and create a three-strand braid. Secure the braid with a clear elastic.
- Repeat on the other side.
- Wrap one braid across the head and use pins to secure
- Repeat the process on the opposite side of the head. Finish with hairspray.
Look #6: XXL Braids
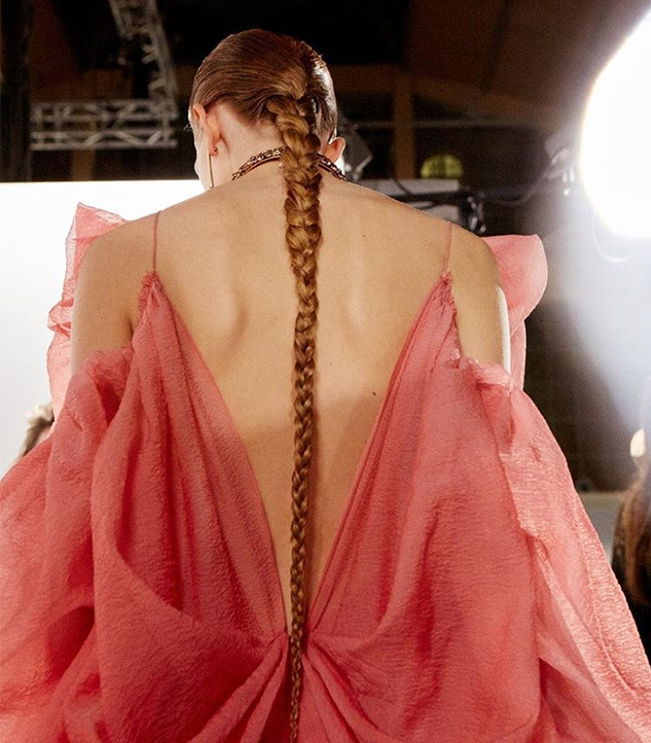
Image: @redken
With her Fall 2018 Ready-To-Wear for Alexander McQueen, Sarah Burton sent down a show that flowed from structured blazers to layered dresses. Vibrant colors made way for the tone of the show to shine brightly. When it came to the hair, Redken Global Creative Director Guido Palau created a magnificent statement braid of XXL length.
- Prep hair by washing with Redken All Soft Shampoo and Conditioner and blow dry.
- On clean, dry hair, apply Redken Hardwear 16 with a flat, fine-tooth comb, working in v-shaped sections starting from the nape of the neck and moving towards the front of the head.
- Once gel has been applied throughout, use a wide-tooth comb to pull hair straight back, creating rows of comb marks in the hair.
- Starting at the nape of the neck, tightly braid hair into a three-strand braid, applying more Redken Hardwear 16 while working down the lengths.
- Secure the end of the braid with an elastic and finish with Redken Forceful 23 to hold the look.
Look #7: Backside Braids
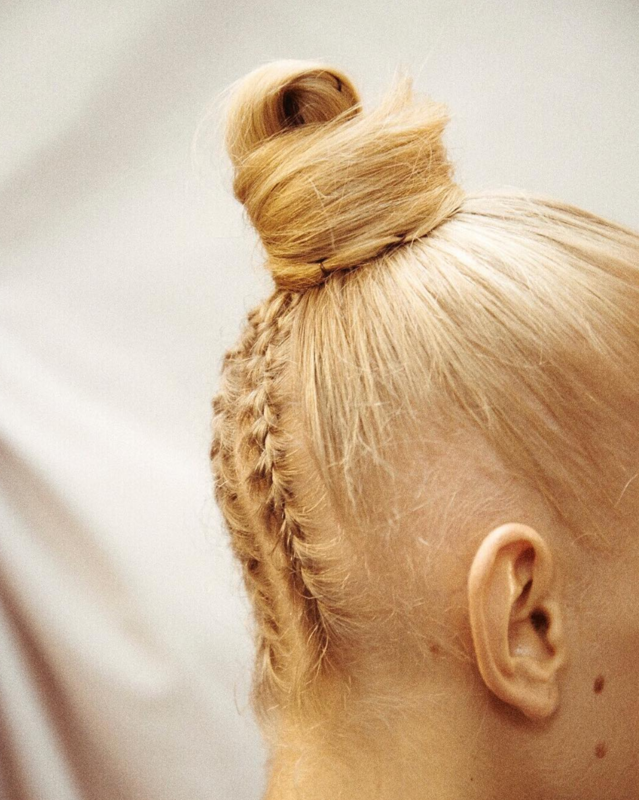
Image: @redken
Chic, simple, sexy and yet effortlessly cool. We can't help but swoon over this style. With never-ending, dynamically different styles and a history of a wow factor, Guido Palau never disappoints. This subtle braided bun draws on the influences of last years love for the ballerina bun seen at Valentino and creates an updated classic that any girl would want to wear. This one is for the very skilled at-home braider or simply save it for your next salon visit. The key to this look is clean sections. You would need to tip your head forward starting the micro-french braids from the nape of the neck. Or, you can take our favorite route to this edgy chic yet sweet style, ask your stylists to recreate it in the salon. Your stylist should be able to complete this style in under a half hour and have you back out on the street turning heads in no time. Hear more about the style and the show from Guido and learn how to get the look.
- Start with clean, fresh hair.
- Section the back bottom of the hair (about an inch above the ear,) clipping the top section up.
- Evenly apply Redken Braid Aid 03 Braid Defining Lotion to the back length to give braids a bit of smoothness and extra grip.
- Divide back length with a comb into 3 vertical sections for light hair, or 4 sections for thick hair.
- Flip hair upside down and French braid each of the sections from the nape of the neck to above the ear.
- Secure each braid at the ear line tightly with a small elastic.
- Unclip the top section of the hair and evenly apply Redken Guts 10 Volume Spray Foam throughout the top section of the hair to achieve volume, shine and hold.
- Blow-dry hair away from the face to give it a smooth line.
- Once fully dry, brush hair with fingers and pull into a tight ponytail at top of head following the hairline (slightly behind ears.)
- Secure the ponytail tightly with an elastic.
- Take hair length and make a small loop 1/3 of the way through hair with the length. Secure loop with an additional elastic.
- Wrap the existing length around the loop to complete the knot and secure with an elastic or hairpins.
- Finish by spraying Redken Fashion Work 12 all over to help set and hold style.
Look #8: Basket Weave Braid
Much more interesting than a regular braid, this basket weave braid can be used to accessorize a sleek and smooth style. Try adding it to accent your blowout or a simple chignon. Created by Sam Villa, Co-Founder of Sam Villa and Global Artistic Ambassador for Redken follow along with the video below to get the exact steps and a few tips to getting the look just right!
The Basics: Take a section, slice into 2, twist away from the face, take a section from the top surface, drop in between, twist away, continue rhythm and secure end with elastic.
Top Tips:
- The pattern can be customized to be straight across or diagonal.
- Each row should mirror the sections of the previous row – they don’t need to be exact, but more uniform than relaxed pancaked patterns.
- It’s ideal for one-length hair if working with layers; the pattern might have to start lower (top of ear to nape area).
- When creating patterns, minimize the time hair is loped through elastics by twisting the elastic multiple times to tighten around hair and just loop through once.
- Once the pattern is created, hair can hang naturally, be folded under or sculpted into an updo or ponytail.
Look #9: 3-Strand String Braid
We swear this braid looks much more complicated than it actually is. If you can create a simple three-strand braid, you can complete this stunning style. Starting off with a simple braid, you’ll turn it into a fabulous upstyle in no time!
When it comes to products, you’ll want to utilize Redken Braid Aid 03 and Redken Triple Take 32 to get your look to stay! Sam Villa explains that when it comes to braids, “Product is not an option, it’s a necessity!!” Keep scrolling to see just how to get this Three-Strand String Braid and turn it into a unique hairstyle with just two styling products.
Top Tips:
- Prep Product: Redken Braid Aid 03 is specifically designed to add smoothness and grip so braids, twists and knots are easier to create and last longer. It’s a necessity!! Cover elastics with it before twisting to add a buffer to protect hair from breakage too!
- Finishing Product: Redken Triple Take 32 is an extreme high hold hairspray without the crunch factor. It provides 24-hour control and humidity resistance so styles last longer and look better.
- Pinning: When pinning hair up, insert the pins where fingers are holding the hair for maximum stabilization.
- Sectioning: The amount of hair in the sections determines the size of the braid.
- Pancaking: By using fingers to gently pull apart sections of a braid, it instantly gives the illusion of a fuller textured design.
Look #10: Pull-Through Braid
The thing we love most about this style is its ability to be worn on almost any length hair and looks stellar as a half-up-half-down style.
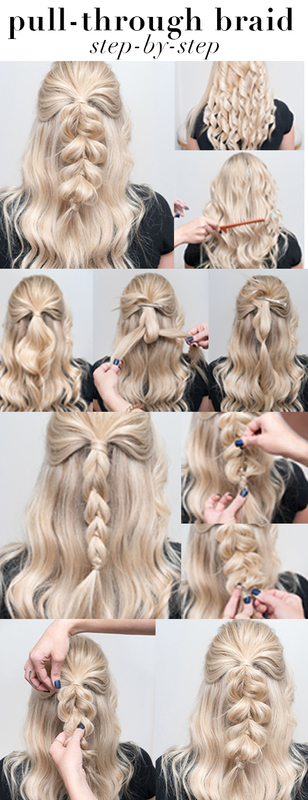
- On dry hair, prep with a heat protectant to protect the hair from damage. Then begin curling the hair, a 1-inch barrel is ideal, but you can use any size to get the desired size of curl. Once all of the hair has been curled, allow a few minutes for the hair to cool down.
- Once the curls have cooled, take a wide-toothed comb and gently separate the curls. This will create a loose wave. You can also spritz hair with a texture spray to add separation, volume, and grip.
- After prepping the hair, section off from the temples to the back of the head and secure with an elastic. Take a piece of hair from the pony you have created and wrap it around the pony. Take a hairpin, round edge facing upward and push it underneath the elastic band upwards. Then take a second hairpin and put the wrap around the strand through the hairpin. Then push the second hairpin through the first so that the wrap around strand has been pulled through completely. Then take the first hairpin and pull the wrap around strand down through the middle of the pony. This way the wrap around strand is secured around the elastic and reunited with the pony.
- Separate the pony in two equal sections. You should now have three sections of the pony. Take the third section of the pony and pull it up in between the two other sections of the pony and clip out of the way. Pull down the other two sections of the pony around the third section and secure with an elastic band. Repeat the steps with the wrap around section and hairpin to cover the elastic.
- Repeat these steps until you reach the end of the hair of the pony or until desired look/length is achieved. Then, secure the end with an elastic and repeat the wrap around the section to hide the elastic.
- Once you've completed the pull through the braid, use a texture powder on the braid, to add texture and fullness. At this point, you can start to pull the sections of the braid to the desired fullness and appearance. Finish the look with a flexible hold hairspray.
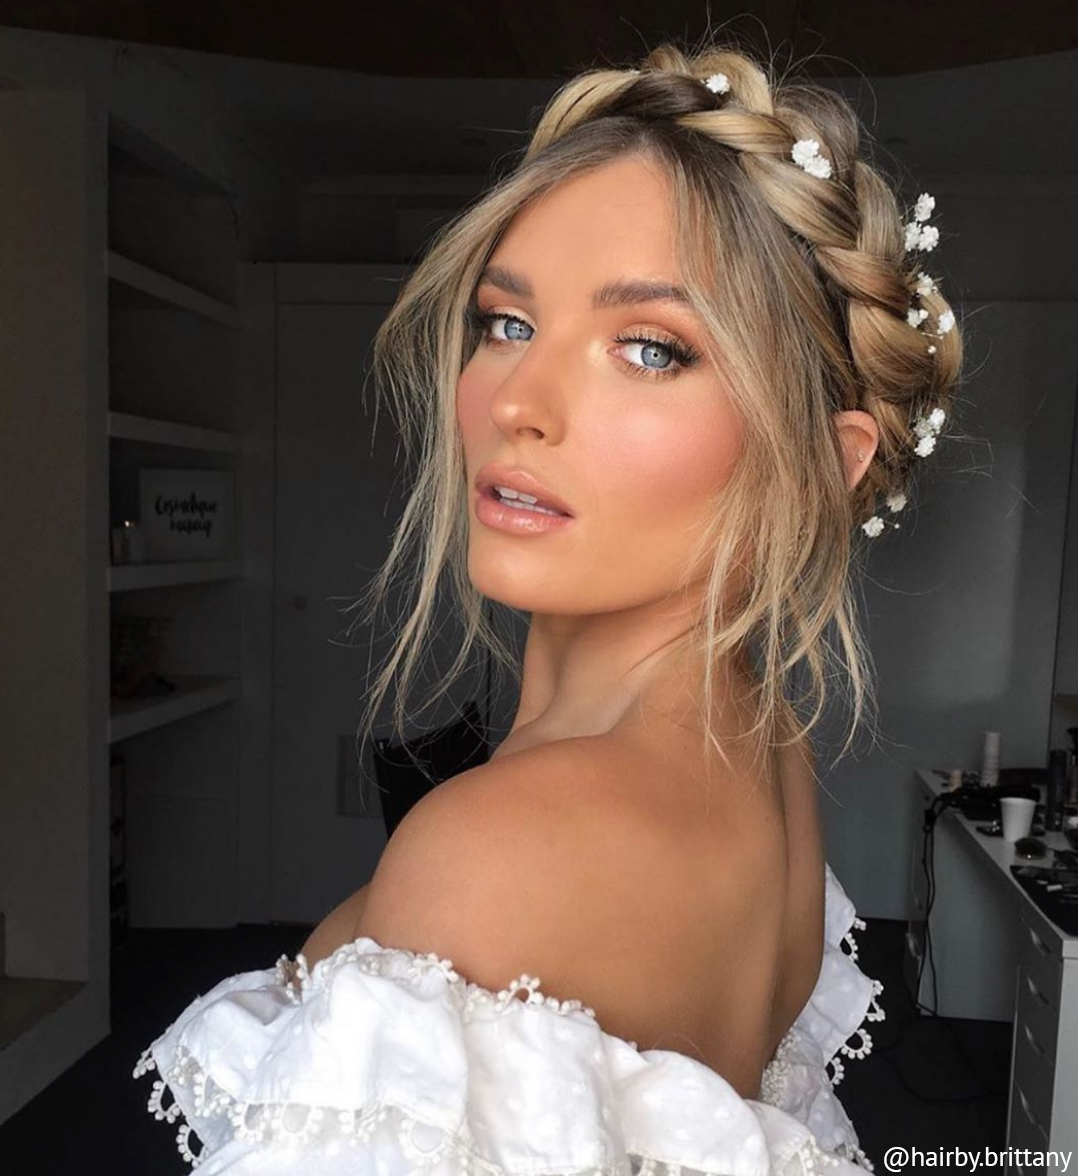
Look #11: Bohemian Braid
Based on what we’ve seen on the runways, we’re sure we’ll see bohemian braids making their way into your Instagram feeds! Lucky for you, no matter the level of your styling skills, stylist Brittany Craig broke it down so anyone can get the look! With a simple Dutch braid base you’ll achieve a bohemian braid in no time.
BASE BRAID
The base of all three looks is two simple Dutch braids, with the hair parted down the center. Make sure hair is combed through well (I prefer using the TEXTURE.COMB) and keep your sectioning clean.
Create the three strand Dutch braids using the underhand technique, as opposed to the overhand technique used in traditional French braiding.
Once the braid is complete and secured with a small rubber band, loosen by gently pulling each strand out to create a softer look. Take a strand of hair from the pony and wrap it around the rubber band for a finished look. Secure at the back with a bobby pin.
LOOK 1: FOR BEGINNERS
Create two simple three-strand braids, then loosen.
Finish by wrapping the ends with a strand of hair over the rubber band, securing with a bobby pin at the back with the open prongs hidden inside the braid.
LOOK 2: INTERMEDIATE
Create two fishtail braids, taking small sections for a more intricate look. Once complete, loosen the braid.
Take the time to further deconstruct the fishtail braid by pulling each strand out a bit. Don’t forget to finish wrap the ends with a strand of hair.
LOOK 3: ADVANCED
Create two four-strand braids that transition into rope braids. Section hair into four strands. From there, you will create a weaved pattern the hair. From left to right number your strands 1, 2, 3, and 4. Note that strand 3 will never move.
Begin by taking strand 1 over 2, under 3, and over 4. For the next row (moving right to left) take strand 4 over 3 and under 2. Next (moving left to right) take 2 under 3 and over 1. This will bring you back to strand 1, which will move right to left over 3 and under 4. Keep going over under, from side to side.
Once you have come to a stopping point, find strand 3 which should still be in the same place. Hold onto strand 3 and push the rest of the braid up to its base.
Adjust any pieces by gently pulling to create symmetry. Take a strand of hair to finish wrap the ends before moving onto the rope braid.
To begin the rope braid, section two strands. Twist strands individually to the left. Once tightly wound, twist strand 1 over 2 and complete the rope braid. If the braid is small enough it will secure itself, however, you can finish with a small rubber band.
For more fashion-forward styles and product picks and be sure to stock up on all goodies the Bangstyle store has to offer!